
How to cosplay at home! Are you looking to get more cosplay photos (or videos) for your Facebook and Instagram account?
I know I know. It’s been way more difficult to get cosplay photos these days, given we are in a pandemic right now. Getting access to photographers is pretty challenging at the moment.
(Note: I’ve mentioned in the past that conventions are the best place to do photoshoots for budget and logistical reasons and being away from cons for so long only proves this).
In any case, Senpai is here to help!
In this post, I will give you 10 tips on how to cosplay at home by setting up your own photoshoot session.
By no means is this a post to replace cosplay photographers; we can never do cosplay without them. But I made this post to allow yourself to get cosplay photos at home in the meantime.
Setting up a photoshoot area at home doesn’t cost much and it doesn’t take too much effort (for the most part). I’ll show you how. Here we go!
DISCLAIMER: I have some affiliate links in this article if you’re looking to wear any of these cosplays. Either I myself have bought from those stores, or I believe they are fairly sweet deals. If you’re buying from these sites, you’re also supporting me and my hobby so I appreciate it!
1. Decide what you want to use to take pictures.

The first thing you want to do is decide if you want to use your phone or an actual camera.
Every cosplayer has a different budget. Maybe you have an awesome DSLR camera that takes top notch pictures. Or you’re a broke cosplayer and the only way you can take photos is with your smartphone. It doesn’t matter. As long as you have something that takes photos, you’re good to go!
Smartphones these days take high-quality photos, so don’t worry if you do not have a DSLR camera. There are a lot of other factors that go into amazing cosplay photos (e.g. the costume itself, posing, editing). So if a phone is all you have, that’s totally fine!
2. Get a tripod.
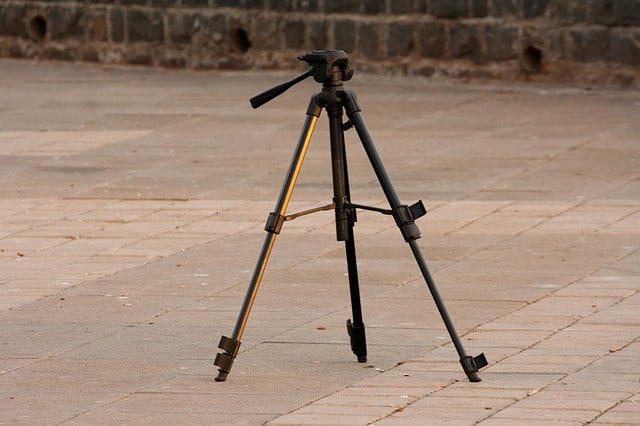
Once you’ve decided on a device to take photos, it’s time to purchase a tripod. Unless you have a family member or roommate to hold the camera for you, you’ll need a tripod to hold the camera while you’re posing. Tripods make a HUGE difference in image and video quality, so don’t skimp out!
Tripods are fairly inexpensive, especially for smartphones. But even for DSLR cameras, you can get a budget-friendly tripod for around $40-$50. Again, it’ll make a huge difference by getting one!
3. Delayed timers are your friend.
As mentioned in tip #2, unless you have someone helping out, you’ll need to work the camera and pose yourself. But you don’t have to worry about this, because we have a thing called remote timers! That’s right, on your camera you can simply delay it so you can walk back to in front of the camera and pose.
Most smartphones and DSLRs have a delay timer option for you to do. But if you really want to go all out, you can purchase a remote timer to have full control. That way, you can make the camera take a photo while you’re standing in front of it; no need to run back and forth!
4. Lighting is important.
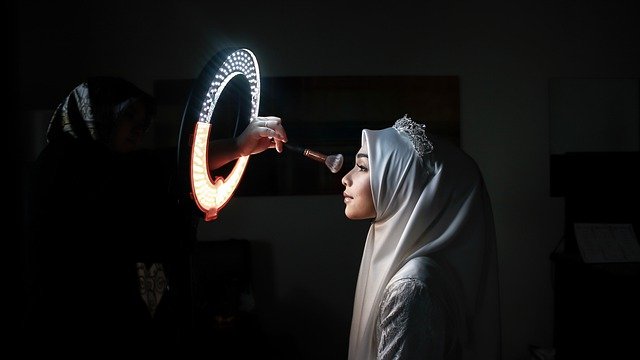
Let’s face it – while the lights inside your home are great for relaxing at home, they’re not the best for taking cosplay photos. Not only that, the photos you take will look painfully obvious that they were taken at home. So this is why I recommend buying a ringlight to complement your photoshoots. Not only will this make your photos a LOT better, but it will also allow you to play around with different settings and backgrounds to spice things up a bit.
Like tripods, you don’t need to buy studio-quality lights to get good photos. You can get something small and affordable like this and it’ll do the job!
5. Backdrops make things beautiful.

If you get bored and want to add a little creativity, you can invest in some backdrops! How cool would your Fire Emblem cosplay (link) look if you had a medieval backdrop in your photo? Or if you are cosplaying a summer version of a character…why not add something cool in the background?
A flat backdrop can get dull quickly, so sprinkle in some accessories and props for your character. This way, your photos are more detailed, interesting, and engaging for the viewers. Props and detailed backgrounds can truly take your cosplay photos to the next level.
6. Have reference photos.
You don’t have to think of poses for your characters on the go! Just like you would with a regular photoshoot, have reference photos on hand so you can practice some poses. And unlike shooting at a con or in a specific location, you don’t have to print the photos out. You can just look at them on a desktop computer or on your phone.
Before you start doing the real poses, practice taking selfies first to get warmed up for the photos.
7. You can also use your backyard.

You can get some nice photos outside in the front or back of your house. For some cosplays, it would probably look better shooting outdoors.
However, there are a few things to keep in mind. You want to avoid looking like you took some photos on the lawn; it looks very unprofessional! So I suggest portrait shots or shallow depth of field to hide the fact that it was taken in your backyard. Also, try to take the photos on a good day. Cloudy weather is the best time to shoot, as you won’t have to worry about shadows like you would on a sunny day. Taking photos right before sunset is also when you get the best natural lighting; it’s called the “Golden Hour.”
8. Take advantage of home field advantage! Time is on your side.

While your photos and composition may not look as if you had a real photographer with you, you can definitely still take advantage of the fact that you’re at home.
Unlike doing a real photoshoot where you’re confined to a time restraint, at home you’ll have all day when you’re doing a self shoot. So go ahead: experiment with different props, take as many photos as you want until you get the right ones, or even change up your cosplay on the fly. You don’t have a 30 minute or 1 hour time limit like you would with a photographer, so take your time and make any adjustments you need at home!
9. You can do partial cosplays to save money.
Cosplaying at home is a great way to save money, but here’s another budget-friendly trick: only do partial cosplays. What do I mean by this?
Instead of having to make or buy an entire character outfit, just buy the wig and maybe a casual shirt or dress that looks similar. Using your self photoshoot setup, only take headshots of this partial cosplay. Despite doing this, you’d be surprised how many likes and engagement you can get with just a partial cosplay. And you’ll save a TON of money by not having to buy the entire outfit.
So while you’re stuck at home, take advantage of partial cosplays.
10. You can still get help from photographers (for photo editing).

Just because you’re taking at photos at home on your own, it doesn’t mean you can’t use the services of a photographer! Once you’re done taking the photos, maybe you want to do some extra editing and touch-ups after. If this is the case, then hit up a photographer! A lot of them are really good at photo editing programs like Photoshop and Lightroom.
Summary
To summarize, here are 10 tips on how to cosplay at home:
- Decide what you want to use to take picture.
- Get a tripod.
- Delayed timers are your friend.
- Lighting is important.
- Backdrops make things beautiful.
- Have reference photos.
- You can also use your backyard.
- Take advantage of home field advantage! Time is on your side.
- You can do partial cosplays to save money.
- You can still get help from photographers (for photo editing).
And there you have it; 10 tips on how to cosplay at home.
Are you still planning on cosplaying, even as conventions are still closed at the moment? Let me know in the comments below!
My name is Roger Senpai. I’m a cosplayer that’s been in the community for well over a decade now. I’ve traveled all over the world to Anime and Comic conventions and hosted my own cosplay events. Now I’m writing articles for new and experienced cosplayers like you to help inspire, save you money and improve your cosplays!